| Unlike the typical
pen depicted in Part
I, the Vacumatic has a section that screws into
the barrel. The nib and feed are pressed into the section.
In addition, a breather tube is inserted into a hole drilled
into the back end of the feed, and a smaller hole is drilled
to connect the breather tube with the feed’s air
channel. This system allows an unimpeded flow of air to
the back end of the barrel, and it also provides the path
through which ink is drawn into the pen when the filler
is operated. |
 |
| The Filling
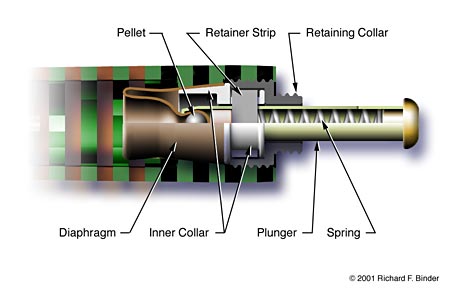
System: The next figure shows a larger view of
the Vacumatic’s unique and revolutionary filling
system. Although Parker advertised the Vacumatic as having
no rubber sac for ink storage, the pen nevertheless does
have a rubber diaphragm. The diaphragm is exposed to the
ink supply, and — like a sac —
can ossify. |
 |
| The diaphragm
is deeply cup-shaped, with a small pocket at its closed
end. In the pocket is a small pellet of hard rubber or
plastic. To install the diaphragm, a small tool is used
to push the pellet into the hole at the end of the tubular
aluminum plunger. The rubber of the diaphragm is stretched
so that it will fit through the hole, which is just small
enough to keep the pellet from popping out when the rubber
is not being stretched. The open end of the diaphragm
is then folded back and fitted around the tapered portion
of the inner collar. No adhesive is required. |
 |
 |
 |
| After the diaphragm
is in place, the filler unit is inserted into the back
end of the barrel and secured by the retaining collar.
This step is also performed without adhesive. Because
the retaining collar is threaded at both ends, it must
be tightened with a special tool that screws onto the
threaded portion that will remain exposed. This threaded
portion receives the blind cap. |
 |
| The retainer
strip passes through slots in the inner collar and the
plunger, to provide a stop against which the spring rests.
The retaining collar secures the inner collar in place
and also prevents the retainer strip from sliding sideways
and coming out of its slots. The pinkish plug (not called
out) is a relatively tight fit into the plunger; it is
blocked by the retainer strip and forms a cushion for
the diaphragm where it is compressed by the pellet. |
 |
| Depressing the
plunger compresses the spring and distends the diaphragm
to drive air out of the barrel. Releasing the plunger
allows the spring to extend, relaxing the diaphragm to
draw ink in through the breather tube. |
 |
| Differences
Through the Years: The original Vacumatic filler
is like the Speedline filler except that there are notches
cut on the sides of the slots in the plunger. These notches
are at the outer end. By depressing the plunger and turning
it slightly clockwise, the user locks the plunger in its
depressed position. |
 |
| Beginning in
1942, Parker used a redesigned filler in order to conserve
critical war matériel. This newer filler is much
simpler in design. It has a plastic plunger that is smaller
in diameter than the aluminum plunger. The spring in the
newer model is fitted outside the plunger. It is attached
to the plunger at the end nearest the diaphragm, and its
other end is made so that it rests on the back end of
the inner collar. Depressing the plunger stretches this
spring. Some late Vacumatic and Duofold models have fillers
whose retaining collars are made of plastic instead of
metal; these plastic retaining collars are softer and
sometimes cannot be removed and reinstalled without being
destroyed. |


