|
I had just returned to my home in
Tokyo after a long vacation when I discovered
a week-old e-mail FROM Toshiya Nakata,
president of Nakaya Fountain Pen Company,
asking me to join him and colleagues Mrs. Noritsuke
and Mr. Suzuki of the Platinum Planning
Division on a trip the next day to Aizu
to meet maki-e artists, Hideaki
Sone and Katsuhiko Terui.
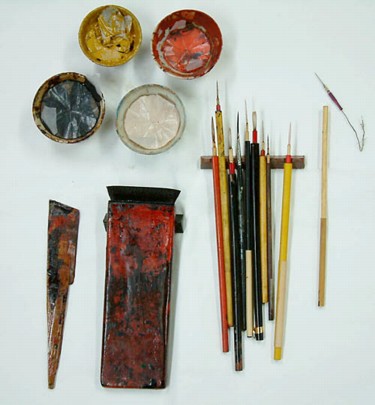
Natural and colored
urushi (in cups, covered with plastic wrap)
with brushes
|
These
were the same two craftsmen who came with Platinum
to demonstrate their art at the 2001 New York
Pen Show.
So early the next morning, I found myself back
on a bullet train speeding through the mountains
of Fukushima prefecture, camera in hand
(which I was requested to bring so I could write
up an article about the day's events).
I was a bit surprised when I was asked to pay
for my own train ticket--roughly $142.00 round
trip--but I took this as an indication of the
financial health of this, and probably a lot of
other Japanese fountain pen companies, in this
era of ballpoints and rollerballs.
After an hour and a half on the bullet train,
and another hour on a local line, we arrived at
Aizu-Wakamatsu station where Mr. Sone was
waiting for us with his car.
Aizu-Wakamatsu is quiet and peaceful town is
famous for its long history as a center for urushi
lacquerware.
Urushi is a natural sap taken FROM
the urushi tree, and is very expensive.
Its natural color varies FROM a light brown to
almost black. It will also cause skin poisoning
if you touch it--unless you have been working
with it so long that you've built up an immunity.
The process of coating a wooden object with
urushi takes many steps, and the process
varies according to the shape of the object. Bowls
take one process called marumo while
boxes with flat surfaces take a different
process called itamo. The basic
procedure for both of these share the following
steps:
- Apply
a foundation layer of urushi with a brush
to cover the wood grain. This step is called
kitagame.
- Apply
another layer of paste made of clay powder and
urushi. This step is called shitaji.
- Sand
the entire surface and apply another coat of
urushi.
- Sand
the entire surface again and apply another coating
of urushi. This step is called nakanuri.
- Lightly
sand again and apply a final coat of urushi.
This step is called uwa nuri.
(Between each of these steps is a drying period
of several days.)
As
you can imagine with all the sanding and coating,
the final product is very shiny and smooth doesn't
even look like wood anymore. The color is usually
a deep black or warm red. The art of urushi
has been around since the Jomon period, ca.
12,000 B.C. - ca. 400 B.C. Back in an era
when plastic was unheard of, such objects must
have caused quite a stir.
Black
or red Urushi lacquerware can be further
decorated with Maki-e or some other
process. Maki-e involves sprinkling gold
or silver or colored powders onto
the wet urushi. The maki
in maki-e is the same Japanese word used
for "sowing" seeds. The "e" (short
vowel) means "picture." So maki-e
means "sprinkle pictures."
Other
decorative styles include urushi-e
which is painting images directly with a brush
and colored urushi (mixture of colored
powder and urushi), and chinkin
which involves carving images INTO the surface
of the wood and then coloring the grooves with
gold foil.
In
recent times, the number of maki-e craftsmen
has dwindled, and the process itself has evolved.
Eighty percent of the work these days is done
by silk screen rather than by hand painting.

Hideaki Sone
|
First
we went to Mr. Sone's home where he showed us several
beautiful treasures including a stunning box completely
covered with gold, and decorated with flower images,
and which was not for sale at any price. It had
taken him and his father six months to complete.
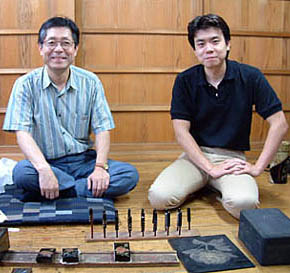
Terui and son
|
Both Mr.
Sone and Mr. Terui learned the trade
FROM their fathers who were the first
two maki-e artists to be officially recognized
by the Japanese government. Mr. Terui has passed
the trade onto his son, Katsuhiro, while
Mr. Sone has apprentices FROM outside the family.
We asked Mr. Sone what qualities make a good apprentice,
and he simply replied, "perseverence."
Mr. Sone then took us to meet Mr. Terui and
his son, and the whole GROUP headed for a locally
famous soba restaurant where we talked about the
local community, their craft, pens, and their
trip to the New York Pen SHOW last year.
After lunch, we went to Mr. Sone's studio, where
there were rows and rows of pen barrels and caps
mounted on chopsticks. There were briar, plastic,
and black hard rubber pens. While traditional
urushi and maki-e has always been
applied to wood, maki-e pens have expanded
to include these other materials, even brass.
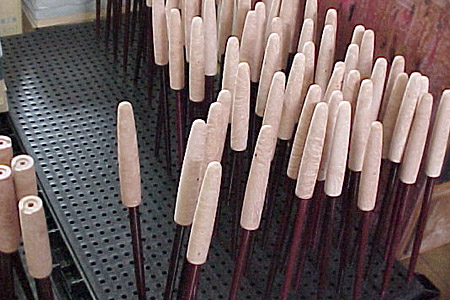
Pen barrels made of
briar
|
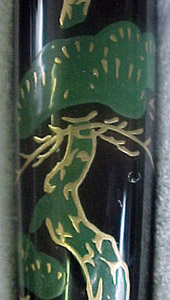
Hand-painted pine bough
maki-e pen
|
Mr. Sone
sat down and demonstrated for us his method of hand
painting a pine bough maki-e decoration
on a pen. First he painted the pine needle portion
with yellow colored urushi. Then, while it
was still wet, we sprinkled green powder on it and
dusted off the excess. He painted a few pen barrels
this way and set them aside to dry. Later, he would
go back and paint the branches.
Next he demonstrated a maki-e technique
using fine strips of gold and abalone.
First he coated the barrel with urushi
which he stores in custom made tubes. This urushi
was a dark brown like molasses and had a natural
and rather unpleasant smell. Next, he carefully
pressed the strips of gold and abalone (which
he had cut earlier) one by one INTO the wet urushi.
Then, he loaded some fine powdered gold gold INTO
one end of a small hollow bamboo rod.
Fine
silk was stretched over the opening on the other
end. Then with delicate tapping, he began to sprinkle
the gold dust over the still-wet urushi.
Before he began this stage, he had us close the
door and windows to prevent the wind FROM causing
a disaster.
Finally
he placed the pen barrel in a cabinet on a vertical
wheel which automatically revolves periodically
to allow even drying without the unwanted effects
of gravity. Later he would coat the entire barrel
with dark urushi and then apply a technique
called togidashi to once again let
the abalone and gold shine through. This technique
is further explained below.
After
asking a few more questions of Mr. Sone and discussing
current projects, and plans for a new line of
Nakaya maki-e pens, we went to visit the
home of Mr. Terui. He and his family live in a
big traditional Japanese home, but with the loft
converted INTO a studio. There was quite a display
of maki-e and other urushi treasures
including wall sized panels covered with intricate
designs. There were also rows of drying maki-e
pens.
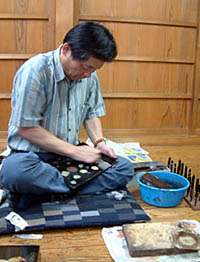
Mr. Terui demonstrates togidashi |
Mr. Terui
and his son explained the technique of taka-maki-e
which is characterized by raised images on
a black urushi background. First, the image
is painted onto a dried surface of urushi.
After this image has dried, another coating of urushi
is applied over the entire surface, including the
image, which becomes almost obscured by the dark
color of the urushi. Once this coat has dried,
the image is rubbed over with soft wet charcoal
until it starts to SHOW through again. This process
is called togidashi. It is repeated
several times, with the gradual building up of the
painted image in several layers (with more details
added each time), alternating with further coating
and stripping urushi. The result is beautiful,
sharp contrast--which you can both see and feel--between
the raised painted images and the deep urushi
background, like bright objects emerging FROM a
dark pool.
After a bit of discussion of business matters
(concerning current and future pen projects),
we left the Terui household for the station to
catch an evening train back to Tokyo.
I
personally took back with me a new appreciation
and sense of awe regarding this ancient Japanese
art which has only been applied to pens in recent
years. I now regard the one hand-painted maki-e
pen I own as a true treasure with which I will
never part. |