|
The Other Vacumatic Tool
Many repairers want to know: When I’m replacing a Vacumatic diaphragm, how do I get a stuck filler out without breaking the filler or damaging the pen’s barrel?
 This article is part of a forthcoming complete article for my own site on Vacumatic diaphragm replacement. This article is part of a forthcoming complete article for my own site on Vacumatic diaphragm replacement.
The first step in replacing a diaphragm is to unscrew the filler’s threaded retaining collar from the barrel. For this you use a Vac wrench or a Vac block, as you prefer. But after you’ve unscrewed the collar, you frequently discover that the diaphragm has glued the filler in place. You can soak to loosen things, or you can wobble the filler gently (risking damage to the plunger), but these methods may not suffice. The solution is a tool that will push the filler out from inside. The illustration below shows the tool that I made for this task.
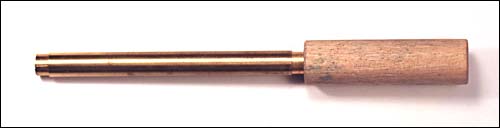
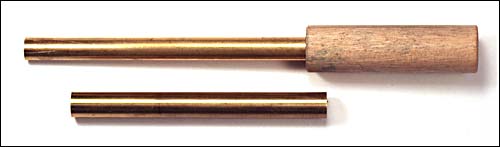
This tool consists of three parts: a fixed tube, a sleeve (sliding tube), both of thinwall brass tubing, and a handle.
The tubing comes from a hobby shop that caters to model railroaders,
and its wall thickness is 0.014” (just less than 1/64”).
For a Deb-sized filler (all plastic-plunger models, most Speedlines, and some
Lockdowns) the sleeve is 9/32” in diameter and
23/4” long and the fixed tube is 1/4”
in diameter and 4” long. (For a “51” the tubes are 7/32”
and 3/16” in diameter.) The handle is a 2”
piece of 1/2” hardwood dowel. Drill a 1/4”
hole 1” deep in one end of the handle, and press the fixed tube in all the
way. Slip the sleeve onto the fixed tube. Ta-da! A Vac filler pusher!
When I actually need one for a Standard or a Maxima, I’ll figure out what
the tubing sizes should be. 
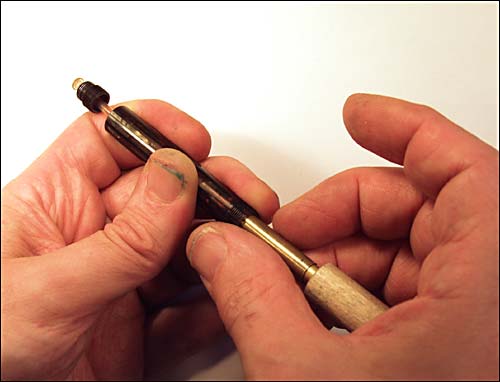
To use the tool, you need to remove the section. (On a “51” this calls for removing the hood and collector/feed/nib assembly.) Then remove all of the old diaphragm that you can get from inside, using dental picks bent into hooks, your set of Father Terry Koch sac removers, or other appropriate tools. Ideally, you’d like to remove all of it, leaving a clear field to insert your pusher tool. But there will usually be some bits left, such as the center part where the pellet goes into the plunger’s pellet pocket.
Now insert the pusher into the barrel, bringing the sleeve into contact with the shoulder of the barrel’s tapered seat. This guides the fixed tube so that it will slip perfectly over the pellet pocket and bear against the end of the filler’s tapered collar. Hold the barrel in your “weaker” hand and use the palm of your ”stronger” hand to push on the pusher’s handle and pop the filler loose. This may take a little force, but I’ve never yet had the tool fail, even with a diaphragm that had been shellacked in.
One problem you’ll run into is that your tool won’t fit into a Deb or Sub-deb Vacumatic. No problem. Just slide the sleeve off, and be careful when you insert the tool so that it seats properly. The “51” tool may also give you cause for concern, as its smaller tubes don’t fit against the shoulder and collar as they should. The tool still works, but it calls for a little more care to avoid shattering the pellet pocket.
Email your question to the Pen Doctor! |
Questions will be answered only through this column on the Pentrace Web site. We regret that time does not permit the Pen Doctor to give a personal reply to every question. |
|